Fillet that Fish & Get Rid of the Bones: Editing for Fun & Profit

You have your rough draft. Yay! Now, what do you do with it?

We have talked about several ways to come up with your rough draft. We encouraged you to use the creative side of your brain, and to write quickly. In some cases, we even encouraged you to plow right on through without correcting little typos.

If you’re writing a book, you want your book to do well. While it will be fun to get the book done, it will also be great to get it to the point to where you can sell the book.

Now is the time to edit. This is when the analytical part of your personality gets to kick in. This is what some of you have been waiting for, depending on your personality type. Some, more than others, find it hard to slog ahead while leaving some of those obvious typos and items that we immediately knew could have been worded better.

Remember, our goal is to get the book done! Many would not be able to do so without that forced action of moving on with the wording that first comes to mind.

Why You Are the Best Editor for Your Book

Several reasons exist as to why you are one of the best persons to edit your book. In fact, you might be the best person altogether. Some of those reasons are:

  • You know where your book is going.
  • You know exactly what you want the end product to be. You may not be able to communicate that too well if you hire out the editing process to someone else.
  • You know your content better.
  • You, and no one else, knows your voice better than you do.

If you want it to really sound like you, then you are the best one to edit your book.

Hiring Professional Editors

It is also a good idea to have a third-party analysis. You need to have someone not as familiar with your content to look over your book. When it comes to the process of proofreading, this is especially true. Right now, however, I’m talking about the other content editing, sometimes it’s called line editing.

There are some options for getting someone professional to edit your book. Years ago, I used Elance. It was a good place to hire freelance workers. They gave you samples and descriptions of the writing. You were also able to look at ratings from people who had used those particular freelancers before.

There was also a site called O’Desk. Elance and O’Desk have now merged, and it is called Upwork. You may want to go to Upwork and check out some of their editors.

Another freelance site you might be familiar with is Fiverr.com. When you go to any freelancing site, look at the descriptions of what they do, their ratings, and ask for some samples. You can probably find a good editor simply by doing that.

There are some other options you can look at more in depth. You can look at some more expensive options. If you have gone with a Hybrid publisher, they may offer some editing services, and you may want to go with them. I have a book that I’m collaborating on right at the moment, and we’re doing it through an excellent Hybrid publisher, so we decided to hire their editors to go over our work.

Computer Editing Techniques

There are also some things you can do on your own. If you are pretty good with grammar, then you may be able to just use the computer software called Grammarly. Or, there is another one that is called Pro Writing Aid. Both of those are very good. If you are not good at grammar, you definitely want to use something like this before you hand it over to someone else. But if you are pretty good with grammar, then it may be that just running it through one of those two pieces of software is all that you will need to do.

There is another type of computer editing you can do. You have the “find and replace” button on your word processing software. So go through and do a search for the word “the.” If you are writing a nonfiction book and you want to do it in a very personable way, you may want to change some of those “the’s” to the word “you”.
For instance, instead of saying “the book,, it might be better for you to say “your book” if, indeed, it is the reader’s book you’re talking about.

Another example would be to search for the word “that”. Many times, the word “that” can be removed from your sentence and still make sense. It won’t always be appropriate to remove the word, but, really, doing so sounds better in a lot of instances. Just be sure you go through your document and check that out.

Now here’s a very important one.: You have the “be” verbs: “am, is, are, was and were.” You can take your computer and search for all the instances of each of those words. Those sentences, more than likely, are written in passive voice. Passive voice is where the action is being done to something. Generally, your writing is more exciting if you have someone or something, doing the action.

So, you could change those sentences to active voice. An example would be, “The ball was hit.” You can change that sentence to, “He or she hit the ball.” See how doing that changes from the action happening to the ball to someone doing the action?

Sometimes you can’t change those sentences; it wouldn’t make sense for you to change some of those things. In those cases, then, just leave them in passive voice.

At times, it may be, that, at the very beginning of certain paragraphs or certain sections of writing, you may want a more powerful word. To start with such a powerful word, you may, in some of those cases, deliberately use passive voice. Just make sure you’re doing it on purpose.

Another set of words to search for with your computer, are words that end in “ly”. Those are generally adverbs. An example of that would be, “He ran into the room quickly.” Quickly is an adverb. Usually, whenever you have something like that, you can make your verb stronger. Let me give you an example. You can change your verb to rushed, “He rushed into the room.” or, “He burst into the room.” Doesn’t that sound better?

For some paragraphs, the writing may just be wordy. You might want to go through and pull out only the important words and rewrite the paragraphs using those important words as the foundation for your new paragraphs.

So, these are some ways that you can fillet that fish and get rid of the bones. The meat represents the good words and wording you want to keep. The bones are the things you want to edit out. We have described ways to edit for fun and profit.

If you catch me on YouTube, it would be really nice if you would make a comment or hit the like button. Also, If you like these videos you can subscribe on YouTube.

For more tips like these, hit the “writing” tab on this blog.

Writing Non-Fiction Books | 7 Steps to Success

Today, we’re talking about writing non-fiction books-7 steps to success.

I want to tell you the story of John, who saw his friend Bill having some problems with his Internet business. John had been down that road before and thought, “Some of those things could be easily corrected.

So, he thought, “Well, maybe I should write a book. No. No one would listen to me.”
Then he talked to his friend Bill, and found out that Bill was open to suggestions. He started working with Bill, and things turned around.

So John persisted in writing a book that would be helpful for people. Here’s how he went about it.

See the Problem(s)

First of all, he saw the problem. He was able to see the main problem and some other problems. He knew what success in this area was like, so he was glad to be able to share his successes, and he wanted others to not give up too quickly.

Dream the Solution

He wanted them to be able to dream about their success. He knew about his own experience, but since he was writing for more than just himself and Bill, he decided to make sure that he had amassed the information that would help others in their situation.

Do Further Research if Necessary

That meant he needed for information, so he did some further research. After having done this. He started grouping his information together.

There was a problem.

There was a solution.

There were steps to get to that solution. He formulated those grouped ideas as steps and ended up with eight steps.

Show the Steps

He knew he could write an introduction to this book. And after putting in the eight steps, he knew that he could write a conclusion. He could tell them what he was going to tell them, and he could tell them what he had told them.

He began the process of writing his book. Pretty soon, he had this 10 chapter book done, and then he decided to make it better–to make the chapters better. Of course it was a rough draft. He went through and started the process of polishing, which is actually going to culminate in the last step, He went through and caught his typos and spelling errors and made those corrections.

Put in Headings

Then he decided to break up the text in the chapters by putting in some headings. He had at least three headings in each chapter: sometimes he had four, sometimes he had five, sometimes as many as seven. But generally, three or four. So he had had an introduction, and he had eight chapters of steps leading to the solution. Within each of those eight chapters, there were headings that broke up the material, making the chapters easier to read. That type of chapter would allow the person to read a section, digest it, think about it, meditate on it a little, and move on to the next section.

Then, to make it better, as he went through his next pass: catching more than typos and spelling errors, he looked for things like passive voice that just jumped out at him. Thinking of the example of, “The ball was hit.” and he changed it to, “John hit the ball.” as he went through the document again.

Add Some Stories

To make it even better and more interesting, he added some stories. He told about his own experiences. He told about Bill’s experiences, and he told about the experiences of others that described universal experiences. He told the experience of others in a way that would not involve copyright infringement. So he added those stories.

After having done that, he had this great book. It was a book that would solve people’s problems. It was a book that would move them toward their dream of the solutions to those problems. It was a book that was interesting because of some of the stories that were placed inside it.

Polish and Publish

Then he hired an editor to go over the book, and he, himself, polished it even further. He also hired someone to create a cover for his book.

Having done that, his book was ready. The exciting day came, and he published it, fulfilling a dream that grew out of a desire to help his friend.

Conclusion

Writing nonfiction books, seven steps to success: Here were John steps:
First, see the problem or problems.
Second, dream the solutions
Third, research further were necessary.
Fourth, show the steps.
Fifth, put in some headings.
Sixth, add some stories.
Seventh, polish and publish.
Then you have a book.

Why don’t you do that? Can you see a problem that needs to be solved? Can you show the dream for the solution? Can you do further research on your topic? Can you put in some headings and add some stories? Can you proofread and get someone else to help you polish it even more? If you can do that, before you know it, you will be ready to publish your book.

So there you have it: Writing nonfiction books, seven steps to success. See the problems, dream the solutions, research, show the steps, put in some headings, add some stories, polish and publish.

I hope this has been helpful to you. If you would like more tips like these, go to www.randysblogs.com and you will find more tips like these. If you’re looking at this on my blog itself, you can just go the top of the page and click on “writing” and you will find more posts that include these videos. Subscribing to my youtube channel will include a list of most of my videos too.

How To Use Your Questions to Complete Your Amazing Writing Plan

Today, we are going to add “triggers” to your questions in order to help you complete your amazing writing plan. In previous sessions, I talked about how to come up with a writing plan for your book. I’ve called some of the special parts of the plan, “block parties”. Today we are going to see how to finish setting up block parties for each of your chapters.

What I talked about in the past, for a non-fiction book, was to come up with a list of 9-15 questions that are grouped with various headings. For fiction, you may just have 9-15 questions (with no headings) that are grouped in the best order. This is what to do with those questions to come up with a great writing plan.

Three Things to Put With Your Questions in Order to Complete Your Amazing Writing Plan

Begin by coming up with a list of trigger words or phrases. Look at the first question, come up with a list of three trigger words, or three phrases that would remind you of the answer to that question. Or it could be a combination of trigger words and phrases. You might have: trigger word, trigger phrase, and trigger word; or you might have: trigger phrase, trigger phrase, and trigger word. You might have some other combination, but you will end up with a list of three trigger words or phrases for each question.

Then when you get ready to write, you don’t have to worry about writer’s block; you just read the questions and look at your trigger words or phrases. Set your timer for five, six, or up to 10 minutes (whatever length allows you to consistently complete 250 words or 2/3 of a page), as I talked about in previous sessions, and press start. Then write as quickly as you can. This is how the creative side of your brain kicks in and helps you to produce a sparkling rough draft.

Now, this is just a rough draft. Later on, you will leave out some things, you will add some things, and you’ll revise some things. The point is, that you will have something that you can edit.

So, as you look at a plan to complete your book, the best way to do it is to have this writing plan set up ahead of time for all of the chapters. Usually you will have anywhere from 10 to 20 chapters. Once you have all of that data you are ready to write, and you’re good to go. Most of all, you’ll be reminded that writing is fun! You don’t have to worry about writer’s block because you have those trigger words or phrases to get you started.

Whenever I did this with my first book, I did it with just three words per question. (Sometimes, the trigger “word” was a combination of two actual words that fit together. For instance, if you needed to have a negative in there, like, “Don’t quit,” you might need both of those. I let those count as one trigger word.) But I just had three trigger “words” to remind me of the answers to each of my questions.

Three New Items to Put With Each Question as You Complete Your Amazing Writing Plan

More recently, I have used suggested trigger words or phrases. I find it much easier to think of the phrases. So here is my suggestion and what I’m going to do the next time I use this method. I’m going to have the question, and I’m going to have the list of three trigger words or phrases. Then I’m going to pick out three powerful trigger words: A powerful trigger word can be a sight, a sound, or something to do with the senses. It can be an action, or it can be a particular noun that fits the answer to your questions. (Some of your already written trigger words may fit these categories. If so, feel free to list them again for your power words.) Those three Powerful trigger words will be written right below my three trigger words or phrases.

When you start the writing process for these questions, try to incorporate those three powerful words or phrases into the first paragraph. That will kick in the creative writing process even more. I would recommend this expansion of my original idea for you.

Anatomy of A Chapter Writing Plan

So here’s what your chapter your writing plan would look like. You have the working title of your chapter. Then you have your list of questions, and those questions would be grouped with headings. Underneath each question, you’d have three trigger words or phrases. Under that, you would pick out three of the most powerful trigger words. This will help you add the finishing touches as you complete your amazing writing plan.

When you get ready to write, look at the question and fix in your mind the three trigger words or phrases that are the answer to the question. Then Look at the powerful trigger words. Start writing with a goal of using those power words as quickly as possible. I’m looking forward to trying that the next time I use this writing plan.

I can tell you this: Having such a plan is great. It helps prevent writer’s block, and it helps you to write on days when you feel inspired. On those days when you don’t feel inspired, this process is very, very helpful. Then later on when you go back and look at the end result, you will have trouble figuring out which days you felt inspired and which days you didn’t. At least, I often find that to be true.

Well I hope this will be helpful to you. If you use these tips, you will complete your amazing writing plan.

If you find these tips to be informative or inspiring, you can find more here. You can also subscribe to my YouTube channel. If you put in a comment or a like, that will be helpful too. I also have a great course that puts all this together.

Would you like an example of how using these techniques to complete your amazing writing plan will work?

Try this little exercise: Write down a question. Below that, write three trigger words or phrases that remind you of the answer to the question. Right below that, write your thee powerful trigger words.

Now, don’t mull it over. If you have a timer, set it for five minutes. If you don’t have a timer, just look at your watch or a clock.

Now, without giving any more thought. Start writing as quickly as possible. Work in your power words ASAP. Then keep writing as fast as you can, including your other trigger words or phrases. Just keep going. Don’t think. Just write.

When the timer goes off or you see that five minutes are up. Stop!

Look at what you have written. How do you feel? Did it surprise you a little what you came up with?

This is how you can come up with a fun rough draft. Remember you can always edit later.

Please let us know, the results of this experiment for you. Just comment below.

Happy Writing!


Writing tips to use your questions to help you complete your amazing writing plan!

What to Do With Your List of Ideas – Planning Your Great Writing

Today we’re continuing to talk about planning your writing. During the first session, we talked about the need of coming up with a list of 12-18 chapter ideas. The second session in this series explained how to tighten those ideas by eliminating three of those items. So now you should have ended up with a list of 9 to 15 ideas. [Editor’s note: In the video, I talk about narrowing down to 12 ideas, but, actually it could go down to 9 ideas. In the written article, I correct this.] Now, what do you do with those 9 to 15 ideas?

I’m going to give you three optional things you can do, and two required things for planning your writing. When I say required, I mean they are required from the sense of using this quick-writing system.

Mind Map – Optional

The first one is, you can do a mind map. Now you may have already done that. However, after you have refined your list, you may want to do it again. It depends on how much you like mind maps. Mind maps are great tools for planning your writing.

At the center of your page, you write the topic or title of your chapter. Then you take your 9 to 15 ideas and run them out as strands, away from the center of the page, and that central idea. Draw a line out and put one of your 15 ideas there. Then write in another one that is related to that continued in a strand of thought. Draw another line up from that to the other one. You draw little circles around those, so it looks like cartoon thought bubbles.

Once that strand has run out, return to the center of the page. You draw another line out from the center, put another one of your ideas there; one that relates. After the first grouping of those, you continue that strand of thought. Keep doing that until you’ve used all of your ideas. This step is optional, but it would help clarify things in your mind.

Outline – Optional

Another optional thing to do, after you have made your mind map, is to reformulate it as an outline. Use Roman numerals for your major points, and letters or numbers for your sub-points.

Add Headings within Chapters – Optional

Here is another optional thing for planning your writing, but it is highly recommended. Put some headings within your chapters.

This is especially for nonfiction books. When we talk about fiction, then you don’t usually put the headings in. You would just want to have the order of your ideas, and they are arranged in the best way that fits your story.

Again, for nonfiction, this is optional, but I recommend you break up your chapter with some headings.

Now if you have done an outline. You have already figured out some likely content for headings because you have come up with some Roman numerals. Those more than likely would be your headings.

If you haven’t done the mind map and outline, and you just came up with your order of ideas, then look to see where you could insert some headings. Three to five would be a good number. But see what fits best in your mind with the topic of your chapter.

So we’ve got our three optional things: the mind map, the outline, and for nonfiction, it’s optional, but highly recommended, that you insert some headings.

Arranging Order – Required

Here’s what’s really necessary for using those 9 to 15 ideas. You need to arrange them in the best order. A mind map would help to clarify that somewhat because you had to group them together in strands of thoughts. You need to list these 9 to 15 ideas in the best order for you and for your reader.

Turn Ideas Into Questions – Required

After you have these 9 to 15 ideas, you’ve arranged them in the best order and possibly inserted some headings. The next thing for this system is to turn each of those ideas into a question.

Just put “who, what, when, where, why, or how” in front of your statement. Put a question mark at the end, and rearrange it to where it sounds right. You now have a list of 9 to 15 questions for each chapter of your book. If you had inserted headings, you would now have those headings sandwiched in between those questions at the appropriate places.

Remember when we talked about some secrets for writing? Getting your mind to get in gear? For instance, we said, write about cars. It may take you a while to think about that. But if you were to ask, “What kind of car do you have? What was your earliest car? What was the make of your earliest car? How did you like your earliest car? What kind of car do you have now? What color is your car?” you would find it much easier to write by answering questions.

When it comes time to write your chapters, you can just start writing by answering those questions. This is a great way to get away from writer’s block.

That’s the secret. Put those 9 to 15 items in the correct order, and then turn them into questions.

You can do that for fiction too. You will have a list, and it will probably be mostly composed of chronological events. You can turn those into questions. Then you will be ready to start writing.

I will have one more post following this strand of thought.

Today we’ve talked about what to do with your list of 9 to 15 items. To review: Optionally, you can do a mind map, form an outline, and (for nonfiction) add headings in between those ideas. Steps required for this method are: Put that list of 9 to 15 items in the correct order, and then, to really make this work, turn each of those ideas into a question.

So next time I post about writing, it will be telling you even more about how these questions can benefit you and get yourself triggered to write.

If you want more tips like these, check out more posts on my blog. You can also subscribe to my YouTube channel. If you put in a comment or a like, that will be helpful too. I also have a great course that puts all this together.

Make Writing Better – Tighten Your Idea List

Tighten Your List of Ideas

Make writing better? Isn’t that what any author would want to do?

In the last blog post, “How to Come Up With Great Content Ideas for Your Book Chapters”, we talked about using mind maps and brainstorming sessions to come up with chapter ideas. This is part two of that.

What We Did Before

We’re still talking about coming up with great content ideas. In the last blog, we talked about coming up with 12 to 18 ideas. The reason why we wanted 12 to 18, is because we want our chapters to be anywhere from six to 10 pages long. We started our writing plan. Now we are continuing our attempt to make writing better.

Here, we’ll be talking about taking those ideas and “tightening” them.

It will all come together at the end of these few blog sessions as to why you need that many ideas. For now, just keep in mind that you need 12 to 18 chapter ideas. Your chapter ideas can be full sentences, phrases, or just one word, but you need to have 12 to 18 keywords that would help you remember what those ideas are.

What We Can Do Now

Now, we’re going to make these ideas better. I know you’ve worked so hard, coming up with those 12 ideas or 18 ideas or anywhere in between. Now we’re going to tighten those ideas.

Tightening content makes writing better

How?
Eliminate three. I know you’re probably thinking, “That’s easy for you to say. How do you do that?”

Well, here’s how you can do it

First of all, you may have added some ideas by using the question words. Well, then you will probably know which one of those is the least important or the least necessary, so just get rid of some of those lesser important ideas you came up with by using the question words.

It may be that you came up with 18 ideas that were just wonderful, and you’re really having a hard time eliminating any one of them.

If you look closely at the relationships between the ideas, you might be able to combine two into one. When you do that, you still have what you want and you have eliminated one number on the list.

Likewise if you could combine three of the ideas, then you will have eliminated two.

Doing the hard work of making these choices now will help in producing a better rough draft.

Let me suggest that you get your creative juices going. You can combine two similar ideas. If you do this, you’ve eliminated one idea already. It may be that you have three similar ideas, and you can combine them into one, so you’ve eliminated 2 ideas. Allow your brain to work a little and let the creative side kick in.

Tightening your list of ideas will make writing better.

Tightening our list of ideas will indeed make writing better.

In the next session, it will all come together as to why I asked you to come up with that number of ideas, why we tightened it a little bit, and how to put them together in a way that you can have a blueprint for writing your chapter.

If you would like to take your writing to the next level, you can check out my 6-Figure Writing Course Here.

As always, you can see more writing tips on this blog.

How to Come Up With Great Content Ideas for Your Book Chapters

Today we’re talking about some tips that came out of my course, “Six-Figure Writing”, and some information that comes out of my forthcoming book, “How to Write a Book in 28 Days or Less Without Stressing Yourself to Death”.

Figure Out Your Number of Chapters

In previous blog posts, I have talked about the need to come up with a number of chapters. The recommendation would be somewhere between 10 and 21 chapters. This would be especially relevant if you’re writing a nonfiction book, which many of you will be doing. If you’re writing a fiction book, then you can have more chapters than that.

This next step will be helpful in determining the number of chapters that would be best for your book.

Research the Books In Your Genre

I have also mentioned doing some research on what chapters you should have in your book. So you should have come up with a list of topics that could be possible chapter titles and chapter topics. Then you did some research beyond that.

If you haven’t done that yet, you can do so by going to Amazon and finding the top 100 books in your genre. Then look at the top 10 books, and then the top three best-sellers.

Also, look at your own favorite books on the topic from your past knowedge. That will be your group of books for research.

Then, see what chapters those books have in common. While they may have different titles, you will be able to tell that they are all about the same or similar subjects. You should have chapters similar to those in your book, as well.

So, having done that research, you will have some ideas for chapter titles in your own book. Then you should be able to list 4-5 ideas for each chapter. You don’t want these to be word for word, but the ideas will be some that you will be expressing in your own words. You will have a list of sentences or ideas.

Brainstorm for Chapter Ideas

The next step: coming up with great content. Because you’re already familiar with the topic, this content comes from your own mind. You will do this through the process of brainstorming.

Use a Timer

If you remember, in the past I talked about that great little electronic device (a timer) that can help you to set up artificial deadlines. That would be really helpful here because we respond to deadlines.

I recommend you set your timer for five minutes. Then start to jot down ideas as quickly as possible and come up with as many as you can. You don’t have to evaluate how good they are at this point: brainstorm; get ideas down. At the end of five minutes, see how long your list is. Your goal is to come up with a list of 12 to 18 ideas. If you fall short of that, just set your timer again. Go for another five minutes, and force yourself to write.

At the end of that, if you have 12 to 18 ideas, you may be good. It may be that you had more ideas and just couldn’t write quickly enough. If so, set your timer again, and write those ideas down.

Now, you may have more than 18. You might have two chapters there. You might have to decide on that. Or you might be able to tighten it by combining some of the ideas that you had. You may notice that two or three of the ideas that you had are very similar, and they’re actually just one idea stated in different ways, so you can combine those.

Let’s say you still have come up short, and your goal is actually to have 12 to 18 questions. Let me put it like this: You want your chapters to be anywhere from 6 to 10 pages long. In order to do that, you would need to come up with 12 to 18 ideas. If your goal is for your chapter to be 10 pages long, you would want to be closer to 18 ideas. If your goal is anywhere from six pages or above, then anything above, 12 ideas will be good. But you want them all to be relevant.

Ask Questions

What do you do if you have still come up short after brainstorming? Here’s the thing to do. Use the question words: Who, what, when, where, why, and how. Then a two-word question, “what then?”.

Who would benefit from this? Who should do this? What is the main point of this chapter? What are the parts of this chapter? What are the steps that you can take? Why is this important? How will this benefit you? Once you’ve done all of this, what then? What would be the next step?

That should be enough questions. You can write down those questions, plug in your topic, not making them as general as the ones above, and there you go.

You should now have a list of 12-18 ideas, and you’re on your way to coming up with great content for your book chapters. Later, I will explain what to do with those great ideas you’ve come up with..

If this seems helpful to you, and you would like to go through the whole journey from idea to published book, check out this great course.

Incidentally, if you enjoyed this, check out the other writing tips on this blog.

Getting It All Together: Organizing Your Book

Today’s topic, “Getting it All Together – Organizing Your Book,” will help you if you are a new author who wants to get your main chapters laid out- including some of their subtitles. When you do this, you will be able to figure out what chapters to have in your book without having to keep wondering what you should include. We will look at four techniques to accomplish this.   

Let me tell you what I mean…

Four years ago, my wife and I went to Japan. We went to visit my son and daughter-in-law. We arrived just one day before the birth of their youngest child. My wife helped out with the cooking and we had a great time visiting.

While there, I was working on the book, From Mountains to Molehills – Overcoming and Celebrating Your Differences in Marriage. I had four chapters and 50 pages already completed. These 50 pages and four chapters made up my first book. While I was in Japan, I was able to plan the expansion of the book to include fourteen chapters and 150 pages. Using that content, I am working on a series of books, “The Loving Way to a Successful Marriage”, using the acronym “LOVING”, with the first book being about Leaving and the next about Overcoming differences.

Technique #1 – Cool – No Judgment

This first technique I like to call, “cool, no judgment.” What you do is start off by brainstorming. Now, you know that if you’re brainstorming with a group of people, the idea is to just toss out ideas. The same is true when brainstorming on your own. Just write down whatever you can think of, no matter how outlandish it seems at the time. Don’t worry about how far-fetched it seems right now. You can come back later and weed out the less than desirable ideas. Write down questions. Think about what you may have read on the subject. Think about what you may want to research later. The idea is to get your mind working.

One way to brainstorm is to just take a legal pad of paper, and just start writing down ideas, one after the other, with each new idea on a new line. Don’t organize in any way at this point. Don’t evaluate. Just keep writing.

Another option that may help organize a little bit at the time of brainstorming is to create a mind map. Mind maps are great tools for brainstorming and organizing your book at the same time.

A mind map is a tool for the brain. It captures the thinking that goes on inside your head. It will help you think, collect knowledge, remember, and create ideas. To begin, put a topic in a middle “bubble” (similar to a thought bubble from a comic strip). Then, off to the side, put a line and another bubble. Put an idea related to the main topic in the side bubble. As you have other ideas related to the main topic, draw more bubbles. Then, as you think of things related to the side bubble, add another line, and another bubble, and put your idea in there. You can Google mind-mapping ideas for images to help you get started.

While it isn’t necessary, it may be helpful at this point to create an outline. The best outlines go down to at least the Roman numeral level, and maybe one step below that.

Some writers are also speakers. Many speakers like to use an alternate form of outlining that avoids using letters for sub-points. The reason is that is easier to think of “first, second, or third,” while looking at the numbers “1, 2, and 3,” than it is when looking at letters like, “A, B, and C.” I use the “numbers method” for outlining so often, I do it for my writing outlines too.

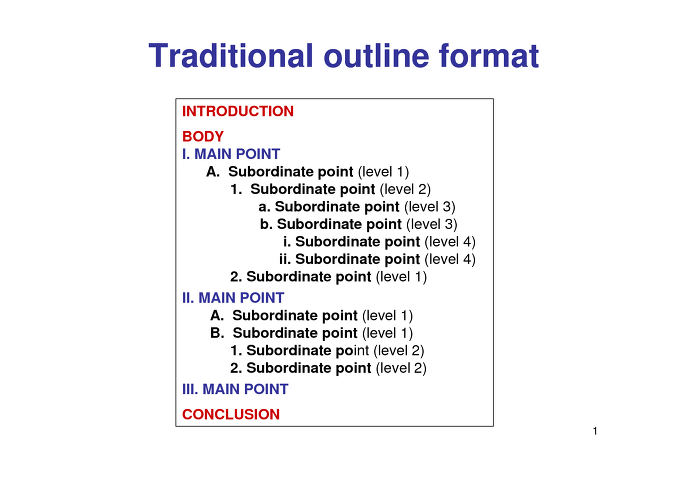
That type of outline then would look like the following:

INTRODUCTION
I. Main Point
…. 1. Subordinate point (level 1)
…. 2. Subordinate point (level 2)
……… (1) Subordinate point (level 2)
……… (2) Subordinate point (level 2)
II. Main Point
….. 1. Subordinate point (level 1)
….. 2. Subordinate point (level 2)
………. (1) Subordinate point (level 2)
………. (2) Subordinate point (level 2)
III. Main Point
Conclusion

Use whatever method works for you.

Technique #2 – Your Moveable Options

Moveable options are things like sticky notes or note cards. While in Japan working on my book, I used note cards. I wrote my ideas down on the cards and spread them out on the bed in the room where we were staying. This way, I was able to rearrange the cards, creating new trains of thought. Being able to move things around is very helpful when it comes to organizing your book.

Sticky notes are another moveable option. Some people put them on a big whiteboard and rearrange them when new thoughts or ideas come to mind.

Of course, computers are another option. It’s easy to cut and paste snippets of text from one place to another. You have various software options too. One, called Scrivener, allows for moving ideas from place to place. I use it at times.

Technique #3 – Your Big Picture – Even On One Page


If you haven’t already created a mind map, now would be a good time. You can take your brainstormed ideas and put them on the mind map. Bear in mind, your whole book is probably not going to fit on an 8 1/2 x 11 sheet of paper. So, what you will probably end up doing is starting with maybe 9 sheets of paper: three for the top, three in the center, and three at the bottom. This will give you one big sheet of paper. Then you can start in the middle with your main idea and branch out from there. The idea is to get it all together in one big sheet. You can get a glimpse of your whole book this way, and it’s quite motivating. The preliminary steps discussed above make it easier to get to this point.

Most people feel more creative when using pen and paper to create mind maps, but there are some good online tools for this too. One of the ones I use occasionally is called “Freeplane”.

Technique #4 – Your Chapter Titles and Subtitles

Having gone through the above steps, you should be able to produce your chapter titles with your subtitles underneath them. It would look like this:

Chapter Title … Chapter Title … Chapter Title … Chapter Title … Chapter Title
… Subtitle ……………..Subtitle………………… Subtitle……………….. Subtitle……………….. Subtitle
… Subtitle ……………..Subtitle……………….. Subtitle………………… Subtitle……………….. Subtitle
… Subtitle ……………..Subtitle………………… Subtitle……………….. Subtitle………………… Subtitle

You will probably have different numbers of subtitles. This is just an example. Ten to twenty Chapters are a good number for a print book. Having the chapter titles and subtitles all laid out in a preliminary fashion is a good result of preliminarily organizing your book.

So, here are the big takeaways from today’s organizing your book topic: You can organize your book. You can brainstorm. You can use some moveable options. And you can get the big picture on one page by using a mind map.

Now, if you’re one of those new authors who are serious about wanting to take this to the next level, let me invite you to check out my Six-Figure Writing Course.

For more writing tips, click here or on the writing tab at the top of the page.

The #1 Secret for Writing Creativity

It seems like “fast” never quite rates “fast enough!” And when it comes to writing creativity any author will tell you that nothing ever seems to go as quickly as we want or expect. Well, let me do my part to help speed things up for you by giving you the #1 Secret to Writing Creativity.

We will look at why we should consider this secret, what it is, and how to go about putting it into practice.

Why We Should Consider this Writing Creativity Secret

There are at least three reasons for considering this secret. The first one has to do with speed, the second with overcoming a common problem, and the third with developing expertise. When combined, these tools will help you complete your book quickly.

It will help us get our books done fast. Getting done quickly will get you to the next step even sooner. Speed is one reason for using this secret.

Working faster will help prevent writer’s block. Writer’s block is defined as “the condition of being unable to think of what to write or how to proceed with writing”. That’s the last thing an aspiring author needs! Overcoming the common problem of writer’s block is a second reason for using this secret.

In addition, just like repetition does for craftspeople, writing rapidly will develop your expertise. An expert crafts person does things very well and very quickly. Think of a plumber working on a clogged sink. He comes in, assesses the problem, uses the necessary tools, and soon has things flowing again. By working quickly, he’s able to move on to the next job. The third reason for using this secret is that it will help you develop your expertise more and more.

What the Writing Creativity Secret Is

Fast writing. This is fairly straightforward. Simply tell yourself to write quickly, and follow through with that thought.

A great way to help stay on track is by creating a “deadline” for yourself. This is not a true deadline for submission; it’s a tool to help keep you focused. Set a timer for 5 to 10 minutes, or, if you’re really good at staying on task, and can write in flow, up to 25 minutes.

Regarding timers, there are many different types that can be used for this purpose. You may already own at least one form of a timer. Most new ovens have a built-in timer. An egg timer from the kitchen section of a department store would also be good. If you have a smartphone, it usually has a timer option. Smart home devices such as an Alexa can set a timer just by saying, “Alexa, set a timer for 10 minutes.”

Writing in these “bursts” will program your subconscious mind. It will say, ” Hey, he/she is really serious about this 5, 10, or 25-minute thing.” So, after a while, you’ll train your brain to put down the most important information first. That’s how your creative mind (or right brain) will begin to work. The more you do this, the more you will become like that crafts person.

Later, you will go back, and you will edit what you have written. This is when the left brain will kick in. When you do the analytical steps, that might be more your personality. Some of us have more of that carefree personality to begin with, so we like the right brain, creative process. Some of us are really analytical, so we like the editing phase of doing this. But I’m telling you, that if you will employ the technique of fast writing, you will find that your creativity kicks in more and more.

How to Put the Writing Creativity Secret Into Practice

It may seem counterintuitive, but just start writing. Don’t think, don’t correct or edit. Don’t even correct typos. (This is a hard one for me.) Just write.

You may come to something where you do need more research. Don’t let that bog you down. Don’t stop. just put in a placeholder like “***, XXX, or Tk.” You might understand how *** might work, and you might understand how XXX could work, but the Tk might confuse you. When I heard about this, the idea was that the letters “t” and “k” do not appear next to each other in any word in the English language.

The idea is that you will put in something that you can do a search for in your word-processing document. When you are in the editing phase, you can search for those places and replace the placeholders with the answers to your questions.

When you are forcing yourself to “just write,” there may be times when you have to write, “I don’t know what to say next but I’m going to keep going.” Of course, that will be edited out later.

Once your timer goes off, stop. Just put an ellipsis (…) at the end. You can come back and complete your thought later. When you write this way, it will kick-start your creativity. The idea is to force yourself to write as quickly as you can while you are in this rough draft phase.

So there you have it! The reasons, the description, and some tips to help any and every author to write quickly and with wonderful freedom of thought.

Give this a try, just don’t give up after 3 or 4 attempts. It can take a few days to get into the flow. Once you learn how to do that, you will be motivated to write more and more as time progresses.

As you can see, fast writing is the #1 secret to writing creativity, and putting it into practice will amaze you at your increase in productivity.

By the way, if you really want to be able to write with freedom of thought, this Creative Writing Course “6-Figure Writing” lays it all out for you! Check it out here.

I wish you well in your writing projects. If you would like more writing tips like these, click here.

Learn to Figure out What Kind of Book You Want to Write – Just Like a Pro

What Kind of a Book Do I Want?

Writing a book is something that over 80% of Americans would like to accomplish in their lifetimes. Yet, far less than five percent, maybe even less that one or two percent seem to actually accomplish their desire. That does not have to be you.

One of the most basic things you can do to write like a pro is to clarify what kind of book you want to write. There are several options from which to choose. Let’s begin by discussing three basic questions.

Question #1 – Fiction Or Nonfiction?

Do you want to write primarily fiction? Who doesn’t love a good thriller or a mystery? How about historical fiction?

Genres such as mystery, thriller, and romance are just a few of the options here. If fiction is your choice, you will want to learn about the “Hero’s Journey”. You will use a lot of elements of storytelling. The hero’s journey has been broken down to show elements that are often seen in three act plays. You can see these in movies and television shows as well.

Do you want to write primarily nonfiction? It may be a “how-to book”. It may be a descriptive book. It may be a book about history or some aspect of a religious text. You can still use many narrative elements. In fact, adding narrative elements will make your book with necessary information in it much more interesting for the reader.

What about Memoirs? Unless you are nationally famous already, the story of your life may be hard to market.

Here is a way to use your life story, or at least parts of that story in your nonfiction books. Intersperse your nonfiction book with all kinds of stories from your life. Interesting stories may help generate positive buzz about your work.

Question #2 – Digital Or Print?

Why would I even ask this?

A few years ago, the sales of digital books surpassed those of print books according to estimates of sales on Amazon.com. Those statistics were mainly for the years of 2011 and 2012.

Since then, the popularity of print books returned.

What that means for you as an aspiring author is that your first book does not have to be a lengthy book. An ebook may be the way for you to go as you wade your way into the process of being an author. An ebook may be much shorter than a print book. The additional appeal of “instant gratification” for the consumer makes the idea of an e-book a good choice for some authors.

Question #3 – Long Book Or Short Book?

I will just give some general observations at this time. At a later date, I will discuss this a little more.

Several years ago, a chapter was considered to be about ten pages long-the amount of time it takes to read one on your lunch break or right before going to sleep.

Just as a chapter was considered to be 10 pages long, an averaged-size book was considered to be about 200 pages long.

Research gave the following generalizations: Nonfiction – 200 pages; mystery – 280; novel 400-500. Ebooks – 25 pages-to the size of print books. (Some are even shorter, down to 8 pages.)

An ebook can be as long as a print book because it is a good idea to have your book in both print and digital form. If you are producing only an ebook, 25-100 pages is quite an acceptable length.

So, here are the big takeaways for every author:
Use these questions to figure out what kind of book you want:
Do I want fiction or nonfiction?
Do I want digital or print?
Do I want a long book or a short book?

The point here is that you can clarify what kind of book you want to write without having to be afraid of going about planning a book in the wrong way.

Now, if you’re an author who is genuinely interested in how to make this even easier, drop what you’re doing and check out my course on How to Write a Book in 28 Days or Less Without Stressing Yourself to Death! To find out more, Click Here.

With this tool, you can clarify what kind of book you want to write and write a good book swiftly… without having to be afraid of going about planning a book in the wrong way!

If you would like more writing tips like these, you can click on the “writing” tab above

Happy Writing!

Start an Online Business Fast – Why You Should Consider Internet Marketing

Internet Marketing

Would you like to be able to start your own business quickly? Would you like to be able to do it in a low-cost way? Would like to be able to make money of of other people’s products that have already been created? Would you like to be able to produce and market your own products? Would you like to have a business that can reach the world?

If the answer is yes to any of these questions, I would urge you to consider Internet marketing when it come to creating a new business. Why should you consider Internet Marketing? Let me give you some reasons.

You Can Start Your Online Business with a Low-Cost Initial Investment

Here’s one reason, it’s a relatively low-cost way of starting a new business.  If you think about some of the well-known franchises, you will find that thousands or tens of thousands of dollars are required to start such new businesses; however, getting into internet marketing is a relatively low-cost way to be able to start a new business.

It may be that you likely already have some of the tools that you would need to be able to do that. You may be watching or reading this on your phone. Or you may be watching and reading on your laptop, desktop, or some type of computer.  Good news: that’s just what you would need to be able to get started with internet marketing.

Oh, yes, you may end up having to have some internet service. And most of you that are watching my videos or reading this today, already have that. But if you don’t, you can go to a restaurant or someplace where they offer free Wi-Fi.

All I’m saying is, Internet Marketing is a relatively low-cost way to get into starting a new business if you’re an entrepreneur. Aside from the relatively low-cost for starting, we can see other reasons for considering Internet Marketing.

You Can Start Your Online Business without Even Having to Have Your Own ProductsAffiliate Marketing

The second reason for getting into internet marketing is because you don’t even have to have your own products. You can promote other
people’s products: you can become an affiliate of their business. This is called affiliate marketing.

You can promote other people’s products. You can find something that relates to your niche, your business, that would help people—something that you highly believe in and something that you would be glad to recommend. Once you have found that beneficial product, you can recommend it to other people through the Internet.

Affiliate marketing involves you pointing people to the products that you have an affiliate relationship with. Whenever someone decides to purchase the product, then you would receive a small commission for it.  Or, depending on what the product is, it might even be a large commission in some cases. But Internet Marketing is a relatively low cost and easy way to get started with your own online business.

While you do not have to have your own products, what if you do already have one or if you desire to develop one in the future?

After You Have Started Your Online Business You Will be able to Produce and Market Your Own Products When You are Ready

Now, after you’ve done affiliate marketing for a while, even though you don’t have
to have your own products, many of you will want to produce your own products.

In past blogs and videos, I have talked about many of us about writing our own books. And then I encourage having spin-off businesses from those books.

Many people dream of becoming an author, and then sitting back and enjoying royalties for the rest of their lives. While it is nice to receive royalties that come from having written a book, many authors talk about how they make much more off of the residual incomes their books produce. They make more by having multiple streams of income that come from writing that book.

So writing a book would be an example of a product you could produce. You could develop online courses. You could start business coaching or life coaching programs. You could promote physical products you have invented.

Once you have a product, you need to promote it to potential customers. Internet marketing is invaluable for this.

You Can Start Your Online Business and Quickly Reach the World

Well, the fourth thing is that you can reach the world in doing this. In the video above you can see my Australia cap. I’m glad I’ve been able to go to Australia many years ago, through an invitation of friends over there. They invited my son to come over on a
mission trip. My wife and I used that as an excuse to go over and pick him up. He was there for three months, and we were there for a month. It was a wonderful experience.

While physically going to Australia was great, the travel can be quite expensive.

My son and his family are now missionaries to Japan. We have visited them twice during their terms on the field, and we plan to go again in the near future. Even finding good deals on airline tickets is expensive.

While we can travel to those places, I can write a blog post such as this one, and I can get comments from Australia, Japan, and other parts of the world. I do this promotion from my own home.

You will see an endorsement for one of my books on marriage from Mrs. Constance McKenzie. I appreciate her doing that, however, she is from Africa, and we have never met in person.

If you would like to know more about Internet marketing, please check out this site for great resources and even training for success with internet marketing.

If you are serious about writing a book, I recommend you check out my course on 6-Figure Writing.

Finally, If you would like more videos, like these, please subscribe to my YouTube Channel.

Thanks for reading.